Buying Laser Engraver Software can feel deceptively simple — until your first “why won’t this file import?” moment, your first misaligned engraving, or the day you realize your workflow doesn’t scale beyond one-off projects. The right software isn’t just a “send job” button; it’s the control center that determines cut quality, repeatability, material waste, and how quickly you can go from idea to finished product.
And the timing matters. The marking and engraving segment is growing, with one market dataset valuing the global marking & engraving laser processing market at about US$4.45B in 2024 and estimating ~8.7% CAGR through 2030. That growth is fueled by customization and small-business production — exactly where software features make (or break) profits.
This guide walks through the must-have features to check before you buy — using real-world scenarios, practical tips, and a few “I wish someone told me this earlier” checks.
What is Laser Engraver Software?
Laser Engraver Software is the program (or set of programs) that helps you design, prepare, and control laser engraving and cutting jobs. Depending on your machine and workflow, software may include:
A design workspace (import/edit vector and raster art)
Machine control (movement, power, speed, focus routines, frame previews)
Job preparation (layers, settings libraries, nesting, toolpaths/G-code output)
Production helpers (camera alignment, batch runs, variable data, costing)
Some ecosystems split this into two tools (design in one app, send jobs from another). Others offer an all-in-one workflow.
Why software features matter more than you think
A laser is basically a precision heat tool. Your software decides:
Where the beam goes (path planning)
How it behaves while moving (power modulation, acceleration, overscan)
What happens when art meets material (dithering modes, line intervals, kerf compensation)
How repeatable the results are (camera registration, templates, saved presets)
If you’re running indoors or at a workstation, software choices also intersect with safety — because materials and settings affect fumes and particulates. Research on desktop laser cutting/engraving has measured emissions like respirable particles, VOCs, and CO, and emphasizes ventilation controls to mitigate exposure. OSHA also stresses adequate ventilation for fumes/vapors produced during laser processes.
Laser Engraver Software compatibility: the non-negotiable first check
Before you fall in love with features, confirm the software can actually talk to your machine’s controller/firmware.
Many popular setups revolve around controller families like GRBL, Ruida DSP, and other G-code based systems. For example, LightBurn’s documentation notes GRBL version differences matter (e.g., GRBL 1.1f+ supporting certain behaviors), and this can affect setup and performance.
What to verify (and why)
Controller type + firmware version: This determines whether you get advanced controls like variable power, smoother ramps, and stable connection behavior.
Connection method: USB, Ethernet, Wi-Fi — each impacts reliability and shop workflow.
Device support policy: Some vendors require detailed protocol documentation to add support for unsupported hardware, which can be a long shot if your machine uses a proprietary stream.
Actionable tip: If you don’t know your controller, look at the machine’s documentation or control board markings, then check the software’s official compatibility docs (not just a reseller blog).
Must-have features in Laser Engraver Software (with keyword variations)
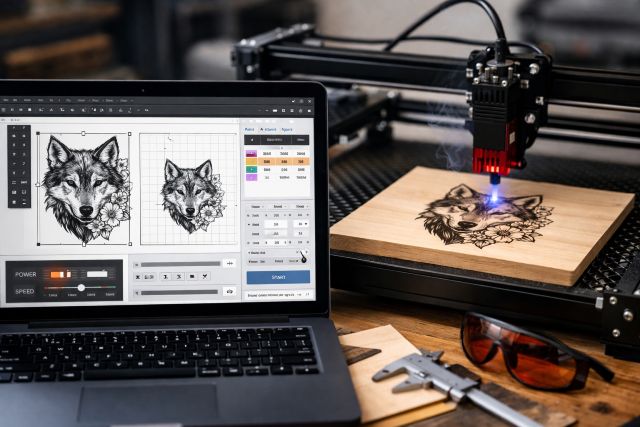
1) Rock-solid import support for real-world file types
Your software should handle the formats you’ll actually receive:
Vector: SVG, DXF, AI, PDF (vector-safe)
Raster: PNG, JPG, BMP, TIFF
Text: TrueType/OpenType fonts, text-on-path, kerning controls
If you sell products, customers will send you odd files. Great software reduces the “file rescue” time that silently kills margins.
Tip for buyers: Test-import 10 files you commonly use (logos, line art, photos, PDFs). See what breaks before you buy.
2) Layer-based workflow with per-layer settings (speed/power/line interval)
This is one of the clearest “pro vs. hobby” separators.
You want to be able to set:
Different speeds/powers for engraving vs. cutting
Separate passes (outline cut, then detail engraving)
Different scan angles, line intervals, and image modes per layer
If your software doesn’t support layers well, you’ll constantly re-run jobs, reconfigure settings manually, and increase mistake rates.
3) Material library and presets you can actually trust
Look for:
A materials library with configurable presets (wood, acrylic, anodized aluminum, leather, slate, etc.)
Custom parameter sets per machine and per lens/nozzle setup
Notes fields (e.g., “birch ply from supplier X chars at 18% power”)
Why this matters: engraving quality is repeatability. The moment you can recall a proven preset, you stop wasting blanks.
Safety note: Some materials generate hazardous fumes; even with good presets, ventilation is a must for many setups.
4) Camera alignment and print-and-cut style registration
If you do product work (tumblers, coasters, signage, labels), camera tools are often the difference between “artisan” and “production.”
You want:
Live camera view inside the workspace
Calibration routines
Ability to position art on real-world objects with confidence
Even without a camera, software should include frame preview and job bounds visualization so you don’t engrave the clamps.
5) Image processing that’s built for engraving (not just “photo editor” filters)
Photos and gradients are where cheap software shows its limits.
Look for:
Dithering modes optimized for laser (Stucki, Jarvis, Floyd–Steinberg variants, etc.)
Control over gamma/contrast, sharpening, and threshold
Overscanning controls to reduce edge banding on raster passes
Real-world scenario: If you sell pet portraits on wood, better dithering can reduce burn blotches and preserve detail in fur—without spending hours in external editors.
6) Variable power, speed ramps, and motion control settings
Engraving quality depends on how power behaves during acceleration/deceleration.
In GRBL ecosystems, firmware versions and modes can influence power behavior; software docs often call out version-dependent behavior for best results.
Even if you don’t speak “G-code,” your software should expose user-friendly controls like:
Min/max power
Constant vs. variable power options
Acceleration-aware power handling (where supported)
7) Production features: batch processing, arrays, and templates
If you’re making money with a laser, these are not “nice-to-haves.”
Look for:
Batch engraving: queue jobs, run sequentially
Arrays and grids: duplicate layouts precisely
Templates/jigs: saved workspaces per product type
Nesting: pack shapes to minimize material waste
This is how you go from 3 items/hour to 15 items/hour without chaos.
8) Rotary and curved-surface workflows
If you plan to engrave tumblers, rings, bottles, or cylinders, confirm rotary support includes:
Rotary setup wizard / steps per rotation
Diameter-based scaling or circumference mapping
Preview tools to avoid “stretched” art
Rotary support is one of the most common “I bought the wrong software” regrets.
9) Job time estimation and costing tools
A software estimate won’t be perfect, but it’s hugely useful for quoting and scheduling.
Some tools emphasize costing features as a differentiator (especially in maker/production hybrid software).
What to look for:
Time estimate with settings awareness
Optional cost calculator (machine time, material usage, overhead)
Saved job history for repeat orders
10) Safety and workflow controls that reduce risky mistakes
Software can’t replace safety practices, but it can reduce common failure modes:
A clear boundary/frame preview
Warnings when job exceeds bed size
Pausing/resuming behavior you can trust
Power test pulses at safe low settings
Logging that helps diagnose failures
Laser safety standards and classifications (often referencing IEC frameworks) exist for a reason; you should treat your workspace like a real production tool, not a toy.
And because emissions are real, build your workflow around ventilation and filtration choices appropriate for your materials.
11) Updates, documentation, and support ecosystem
This is the “boring” feature that becomes critical on day 30.
Check:
Documentation depth (setup guides, troubleshooting)
Active support channels / forums
Update frequency (bug fixes + new device profiles)
If the vendor requires extensive protocol docs to support your hardware, that tells you something about how hard “future compatibility” can be.
12) Licensing model that fits your business
Ask:
Is it subscription, perpetual, or tiered?
Are updates included?
How many computers can you activate?
Can you move licenses if you upgrade PCs?
A cheap license that blocks production features (camera tools, layers, rotary, batch) often costs more in wasted time than an upfront pro license.
Choosing the right Laser Engraver Software for your use case
If you’re a hobbyist with a diode laser (GRBL-style workflows)
Prioritize:
Simple setup and stable connections
Strong raster engraving tools
Clear layer controls and presets
Upgrade path to advanced features later
Make sure your GRBL version and driver settings are supported and documented.
If you’re running a CO₂ laser for products (Ruida-style production)
Prioritize:
Camera alignment + templates/jigs
Layer workflows + reliable repeatability
Time estimates + batch runs
Strong support and documentation
This is where “all-in-one” software can pay off fast.
If you’re marking metal with fiber/galvo workflows
Prioritize:
Parameter depth (hatch patterns, frequency controls, multi-pass control)
Reliable text + serial workflows
Repeat precision and job logs
Even if your included software “works,” check whether it slows down production quoting, layout, or file prep.
Common questions buyers ask
What’s the most important feature in Laser Engraver Software?
Compatibility with your controller/firmware is #1—because no feature matters if the software can’t reliably run your machine. Next, look for layer-based settings, a material preset library, and alignment tools to reduce waste and increase repeatability.
Do I need separate design software if I buy Laser Engraver Software?
Not always. Many users do everything in one place, but a separate design tool helps if you need advanced illustration work. The key is whether your laser software can handle your everyday edits (text, offsets, simple vector cleanup, image engraving prep) without forcing constant app-switching.
Can laser software improve engraving quality, or is it all the machine?
Software can significantly improve results through better image processing, motion-aware power handling, and repeatable material presets. Firmware and hardware still matter, but software is the layer that turns “capable machine” into “consistent output.”
Is ventilation part of the software decision?
Indirectly, yes. Different settings and materials change emissions. Studies on desktop laser cutting/engraving highlight respirable particles and gaseous pollutants and recommend ventilation controls to reduce exposure. OSHA guidance also emphasizes ventilation for fumes/vapors produced during laser processes.
Conclusion: buy Laser Engraver Software for your workflow, not the demo
The best Laser Engraver Software is the one that matches your controller, supports your file types, and helps you produce consistent results with layers, presets, alignment tools, and production workflows. If you’re a hobbyist, prioritize stability and learning curve. If you’re selling products, prioritize repeatability, camera/template workflows, and batch production tools — because time and waste directly hit profit.
Finally, treat safety as part of the buying decision: reputable sources and research highlight the need for ventilation and controls around laser-generated fumes and particles. The right software won’t replace safe practices, but it will reduce mistakes, improve consistency, and make your laser feel like a reliable production tool — not a constant experiment.


Leave a comment